Includes affiliate links that help offset our expenses at no cost to you.
Instructions
This tool will generate a PDF document containing a printable map ruler with user-selectable scales. It can include custom pace scales, which enable you to directly measure distances in your own paces on practically any map. We’ve had good results using a Brother P-Touch PC-Connectable Label Maker to print rulers onto 18mm Clear Label Tape, and you can also print on letter-size paper with a regular printer.
This should work in most browsers, but we recommend Google Chrome. If you are using FireFox and the ruler keeps opening in a separate application, there is an option to display the ruler directly in this page: in your browser’s Settings menu, under Applications look for Portable Document Format (PDF) and change the action to Open in FireFox.
With Chrome and most other browsers you can print a ruler directly from the preview window above (look for a printer icon) but if your browser doesn’t support that, you can click the Open PDF button to open the document in a new tab. When printing, look for a ‘Scale’ setting in your print dialog and make sure to set the scale to ‘Default’, ‘Actual Size’ or ‘100%’ (this can vary depending on which browser you are using). Don’t select ‘Fit to Page’ or similar, because it will mess up the scaling.
When using a label printer you will need to open the Printing Preferences dialog for your printer and set the Width to match the Print Format setting, and the Length to match the Ruler Length setting (see below). Here is an example, although your printer driver’s dialog may look different:
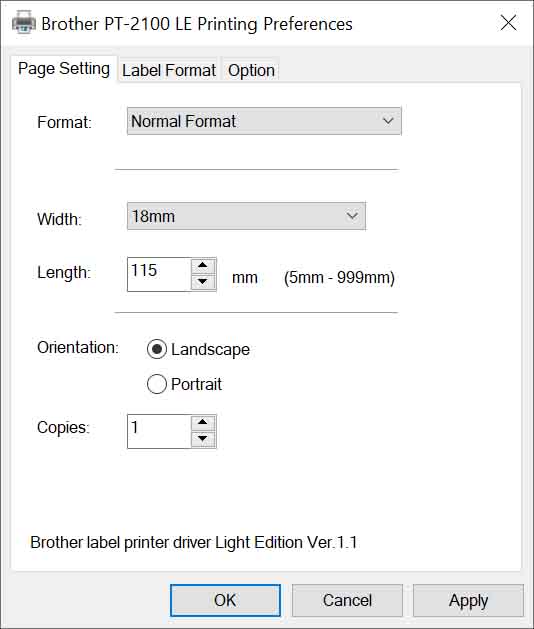
Print Format
The Print Format setting lets you specify a standard label tape width, or a letter-size page for printing on an ordinary printer. This deterimines the page size of the PDF document that is generated.
Upper and Lower Units
The units of each side can be specified, and if “Paces” are selected then a Pace Count can also be specified. For the Pace Count, enter the number of paces (two steps) it takes you to travel 100 meters. If you don’t know this number you can measure it by marking out a known length such as 50 or 100 meters and walking it while counting your paces. Repeat several times and average the result. You may want to print a scale with a larger pace count for rough terrain where it will take more paces to cover a given distance.
Ruler Length & Height
This is the physical size of the ruler that is printed. When printing labels it is recommended to set the Height equal to the full width of the label tape, although the printer may clip the index lines a little at the top and bottom edges. You can also reduce the height to make the ruler slightly narrower than the tape to avoid this clipping.
Map Scale
Enter the scale printed on the map, or measure the map scale if necessary. Some maps may show a scale such as 1:24,000 but may not actually be printed at exactly that scale, so it’s best to measure some features on the map to check the actual scale. To get the scale factor, just divide the real-world size of a known feature (such as the distance between two road intersections) by the physical distance measured on the map in the same units such as meters. The drop-down list at the left lets you enter common map scales easily, but you can also type an arbitrary scale into the box to the right.
Printer Scale
This lets you fine-tune the scaling to match a particular printer, because printers don’t always print things at exactly the specified size. Adjusting this is usually not necessary because measuring distances by counting paces is an approximate technique that’s affected by things such as terrain, so if a ruler is off by 1% it probably won’t matter. But if you want your ruler to be as accurate as possible then you need to experimentally determine your printer’s scale factor.
A simple way to do this is to set the map scale to 1:10,000 and the printer scale to 1.000, and print a ruler that shows a range up to 1.0km. Then measure the physical length of 1.0km on the printed scale, which ideally should be 100mm. If it is not, divide the printed length by 100mm and enter this number into the Printer Scale box. For example if it prints 98.3mm wide then enter 0.983. Try printing again and the resulting print should be extremely close. You can tweak this value experimentally, keeping in mind that making the Printer Scale larger will make the printed ruler shorter.
Mirror Image
Checking this box produces a mirror image of the ruler. This can be useful to eliminate parallax by attaching a clear label to the underside of a plastic sheet as described below.
Printing Problems?
If printing directly from your browser doesn’t work right, it may work better to save the PDF document to your computer and then open it in Adobe Acrobat Reader in order to print it. You can use the ‘Download’ button in the PDF preview panel above if your browser provides one, or click the Open PDF button to open it in a new tab and then use your browser’s Save-As menu (Ctrl-S in Chrome) to save the file. Here’s an example (thanks to Bill who figured it out!) of the Brother PT-D600 properties and Adobe print dialog:

Practical Guidelines
Single-scale rulers can be printed as narrow as 6mm (1/4″), which works well for adhering directly to a compass like this:
Two-scale rulers work better when printed on 12mm (1/2″) or 18mm (3/4″) clear label tape and affixed to a sheet of clear plastic:

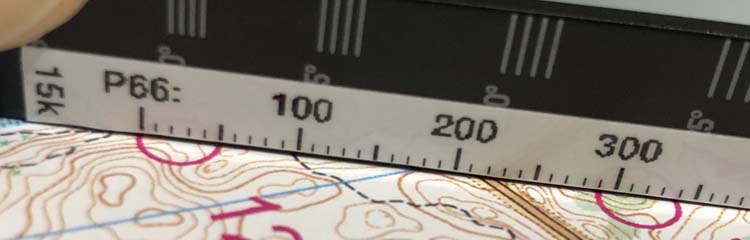
As shown in these images, you can measure paces quite accurately from orienteering maps if you align the index marks with the edges of the circles instead of the center.
The following are a few different methods to print and assemble this kind of ruler. For any of these methods, an ordinary paper punch works well to punch a hole on the right hand side (opposite the map scale) so you can keep your rulers together on a lanyard.
Easy
Use a Brother P-Touch PC-Connectable Label Maker to print a ruler onto 18mm (3/4″) Clear Label Tape, and stick the label onto a sheet of rigid clear plastic. The Mirror Image option is recommended so you can place the label on the underside of the plastic sheet, especially if the plastic is somewhat thick, because it puts the printing right on the map to reduce parallax.
A good source of clear plastic material for rulers is the clamshell packaging in which many products are frustratingly packaged, as it often has flat areas large enough to cut out ruler material. Another good source is the thin clear lids that come on things like boxes of chocolate. If you can’t find any recyclable material that’s suitable, office supply stores carry all sorts of items made of clear plastic that can be cut up and used.
Cheaper
If you don’t have a label printer, you can print a ruler onto plain paper or transparency film and then laminate it using a thermal laminator.
Cheapest
Print the ruler onto ordinary paper or heavy card stock, optionally apply clear packing tape on both sides to make it more durable, and cut it out. You won’t be able to see through it but it still works if you cut right up to the tick marks.